Where to put highlighter on face is one of the most searched makeup questions — and for good reason. When you put highlighter in the right spots, your skin looks glowing, fresh, and lifted. When you put it in the wrong spots, it can look patchy, greasy, or just plain odd.
The good news? This is one of the easiest makeup skills to learn. You do not need any special talent. You just need to know the right spots — and this guide will show you exactly where, step by step, in the simplest way possible.
Whether you are a complete beginner who has never touched a highlighter before, or someone who has been using it wrong for years — this guide covers everything. We have also filled in all the gaps that other beauty guides miss, like highlighter placement by face shape, the best placement for darker skin tones, and what spots to completely avoid.
Let us get into it.
What is Highlighter and What Does It Do?
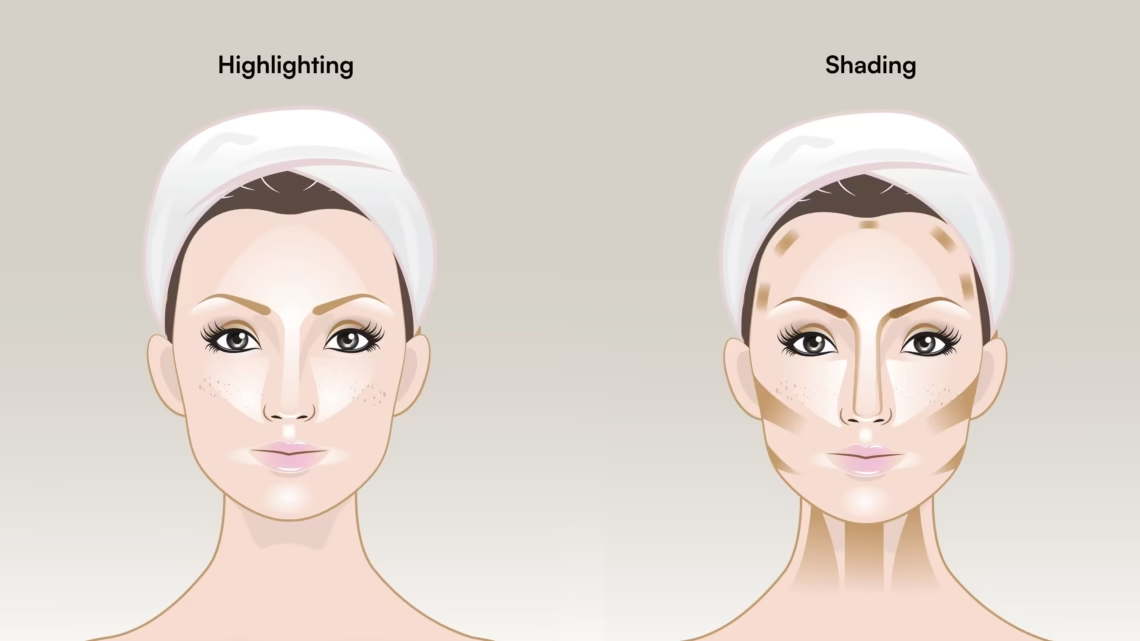
Highlighter is a makeup product that reflects light off your skin to make certain areas look brighter, more lifted, and more glowing.
Think about how sunlight hits your face. When you stand in natural light, some parts of your face catch the light and look bright — like the top of your cheekbones, the tip of your nose, and the area above your lips. Other parts sit in shadow — like the hollows of your cheeks and under your jawline.
Highlighter copies this natural effect. You apply it to the areas that naturally catch light, and it makes those areas pop even more. The result is a radiant, lit-from-within glow that looks natural and beautiful.
What highlighter is NOT: It is not a concealer. It is not a foundation. It will not cover dark spots or redness. Its only job is to add glow and luminosity to specific areas.
What Does Highlighter Look Like?
Highlighter usually looks shimmery, pearlescent, or metallic. Some highlighters are very subtle with just a soft sheen. Others are bold and give you a full chrome glow. As a beginner, always start with a subtle one — you can always build up more intensity later.
Why Should You Use Highlighter?
Here is what a good highlighter placement does for your face:
- Makes your cheekbones look higher and more defined
- Makes your eyes look bigger and more awake
- Makes your nose look slimmer and more refined
- Makes your lips look fuller
- Gives your whole face a healthy, dewy finish
- Makes you look more youthful and well-rested
Where Are the “High Points” of Your Face?
Every beauty guide mentions “the high points of your face” — but most never explain what that actually means. So let us clear this up right now.
The high points of your face are the areas that stick out the most — the parts that would get hit by sunlight first if you stood outside. These are the spots where light naturally falls.
Here is an easy way to find them yourself: Sit near a sunny window. Turn your face slowly from side to side while looking in a mirror. Notice which parts of your face catch the light and start to glow or glisten. Those are your high points. That is exactly where your highlighter goes.
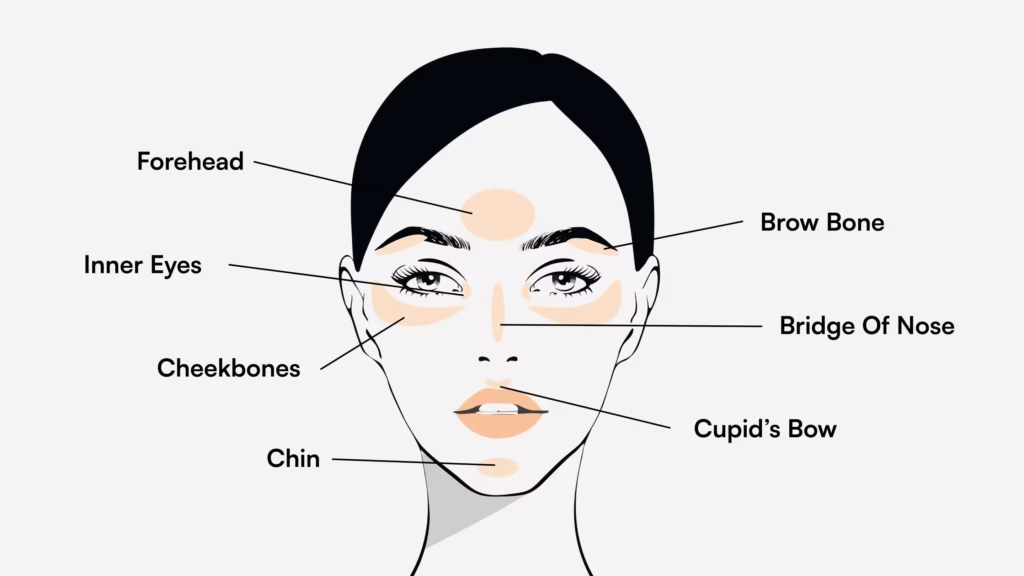
The main high points on most faces are:
| High Point | Why It Catches Light |
|---|---|
| Top of cheekbones | Bones protrude outward here |
| Bridge of nose | Highest point of the face |
| Brow bone (under eyebrow arch) | Bone sticks out above eye socket |
| Inner eye corners | Light bounces off naturally |
| Cupid’s bow (above upper lip center) | Curved area catches direct light |
| Center of forehead | Slightly rounded, catches light |
| Tip of chin | Sticks forward slightly |
These are the seven main spots. You do not have to highlight all of them at once. Most people highlight just two or three — usually the cheekbones and nose bridge at minimum.
Exactly Where to Put Highlighter on Your Face
Now let us go through each spot in detail. We will tell you exactly where to apply it, how much to use, and what it does for your look.
1. Cheekbones — The Most Important Spot
This is the number one spot for highlighter application. Almost every makeup look starts here.
Your cheekbones are the bones that run from your ears toward your nose, right below your eyes. The area you want to highlight is the very top of that bone — not the flat part of your cheek below it.
How to find the exact spot: Smile gently. The highest point of your cheek that rises up — that little “apple” or bump — is where you apply highlighter. Or use your fingers to feel your cheekbone. Start from your ear and run your finger along the bone toward your nose. The highest ridge is your target.
How to apply it: Use a fan brush or fluffy brush. Sweep highlighter in a “C” shape — starting at your temple, sweeping down along the cheekbone, and curving back up slightly. Blend well. There should be no harsh lines.
What it does: It lifts your face visually, makes your cheekbones look more defined, and gives you that classic radiant glow.
Beginner tip: Start with a very small amount. A little highlighter goes a long way here. Build up slowly.
2. Bridge of the Nose
Highlighting the nose bridge is one of the most flattering things you can do — especially if you want your nose to look slimmer or more sculpted.
The bridge of your nose is the flat bony area between your eyes, running down the center of your nose. Stop before you reach the tip — the tip of the nose is generally not a great place to highlight because it can make your nose look wider or shinier in an unflattering way.
How to apply it: Use a small flat brush or even your fingertip. Apply a thin line of highlighter down the center of your nose bridge only — from between your brows to just above your nose tip. Keep it narrow and centered.
What it does: It creates the illusion of a slimmer, more defined nose. It also draws the eye to the center of your face, which creates a more balanced, symmetrical look.
Beginner tip: Use a liquid or cream highlighter here rather than powder — it gives a more natural, skin-like finish.
3. Brow Bone — Under Your Eyebrows
Highlighting the brow bone instantly makes your eyes look more open, awake, and lifted.
The brow bone is the area directly below your eyebrow — the little shelf of bone that sits just above your eyelid crease. This is a slightly tricky spot for beginners, but once you get it right, it makes a huge difference.
How to apply it: Using a small pencil brush or your fingertip, apply a small amount of highlighter just below the arch of your eyebrow (the highest point of your brow). Blend it gently. You can also apply a tiny bit just above the eyebrow for extra lift.
What it does: It creates an “eye lift” effect — your brows look more arched and your eyes look bigger and more wide-open. It enhances the shape of your eyebrows too.
Beginner tip: Less is more here. A tiny amount of a subtle, non-glittery highlighter works best. Avoid chunky glitter near the eye area.
4. Inner Corners of the Eyes
This is the secret weapon that makes you look more awake, even on your most tired days.
The inner corner of your eye is the small area right next to your tear duct — the little pink bit where your upper and lower lids meet. Adding highlighter here opens up the whole eye area.
How to apply it: Use the tip of a small brush, a small eyeshadow brush, or even your pinky fingertip. Dab just a tiny dot of a light, shimmery highlighter right into that inner corner. Blend gently.
What it does: It brightens the whole eye area, makes eyes look wider and more awake, and counteracts the tired, heavy look that many people get around the eyes.
Beginner tip: This is one spot where a fine shimmer or even a slightly glittery highlighter works really well because the area is so small. Pick a shade that is very light — almost white or pearl.

5. Cupid’s Bow — Above Your Lips
Adding highlighter to your cupid’s bow is the easiest way to make your lips look fuller without any lip filler.
Your cupid’s bow is the double curve at the center of your upper lip — the little “M” shape. Highlighting this area draws attention to the lips and creates the illusion of more volume.
How to apply it: Use a small brush or the tip of your finger. Apply a tiny bit of highlighter right along the peaks of the cupid’s bow — just the two little raised points at the top of your upper lip. Blend softly. Do not apply it across the whole upper lip.
What it does: It makes the lips look more three-dimensional and fuller. It also gives your whole mouth area a polished, finished look.
Beginner tip: A cream or liquid highlighter works much better here than powder. Use just a tiny amount — this is a very small, precise spot.
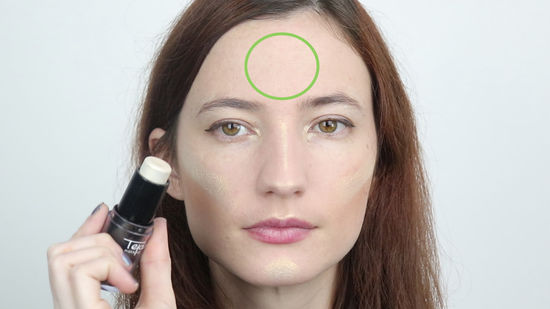
6. Center of the Forehead
Most beginners skip this spot entirely — but it is a great one for creating a balanced, symmetrical glow across your whole face.
The center of your forehead is the area right between your hairline and your brows, in the middle. Because the forehead is slightly rounded, the center naturally catches more light than the sides.
How to apply it: Use a large fluffy brush. Lightly sweep a matte or very subtle shimmer highlighter in a star shape — from the center, moving outward gently. Keep it light. This is not a bold statement like the cheekbones.
What it does: It adds dimension to the upper part of your face and creates a more complete, all-over glowing look. It balances out the cheekbone highlight so the glow does not just sit on the lower part of your face.
Beginner tip: Use a matte highlighter here if you have oily skin. Shimmer on the forehead can look greasy if you naturally produce oil there.
7. Tip of the Chin
A small touch of highlighter on the chin ties your whole look together and draws the eye down toward the center of your face.
The very tip of your chin — not the sides, just the central point — naturally catches light. Adding a tiny bit of highlighter here makes your face look more elongated and sculpted.
How to apply it: Use your fingertip or a small brush. Dab just a tiny bit of highlighter on the very center tip of your chin. Blend well so it looks like natural glowing skin, not a dot of product.
What it does: It elongates the face, adds a final touch of balance, and makes the whole face look more three-dimensional and sculpted.
Beginner tip: Skip this spot if you have a very round chin or if you feel your chin already has too much attention. It works best on longer or oval face shapes.
Where NOT to Put Highlighter
This section is something most competitors miss — and it is just as important as knowing where TO apply highlighter.
Here are the spots to completely avoid:
| Where to Avoid | Why |
|---|---|
| Flat center of cheeks (below cheekbone) | Makes face look flat and puffy |
| Tip of the nose | Makes nose look wider and oilier |
| Under-eye area below lash line | Highlights wrinkles and puffiness |
| Sides of the forehead / temples | Makes face look wider |
| Sides of the nose | Draws attention to width |
| Around the mouth (sides of lips) | Makes mouth look droopy |
| Chin sides | Makes chin look wider |
| Anywhere with active breakouts | Draws attention to texture |
The golden rule: If an area sits in shadow naturally (meaning it does not catch sunlight when you stand outside), do not highlight it. Highlighter is meant to enhance what light already does — not fight against it.
How to Apply Highlighter Step by Step — Beginner Routine
Here is a simple, beginner-friendly routine you can follow every single time:
Step 1 — Prep Your Skin Moisturize your face and apply primer if you use it. Dry, flaky skin will make highlighter look patchy and uneven. Well-moisturized skin makes highlighter look like it is coming from within.
Step 2 — Apply Your Foundation Put on your foundation and concealer as usual. Let it set for a minute or two. Highlighter goes on top of foundation — not under it (unless you are using a liquid highlighter mixed into your base, which is a more advanced technique).
Step 3 — Pick Up Product on Your Brush Lightly swirl your brush in the highlighter. Tap off any excess. You want just a small amount on your brush — it is much easier to add more than to take away.
Step 4 — Apply to Cheekbones First Start with the cheekbones since this is the most important placement spot. Sweep your brush along the top of the cheekbone in a “C” shape. Blend well.
Step 5 — Move to the Nose Bridge Apply a thin line down the bridge of your nose. Keep it centered and narrow.
Step 6 — Add to Brow Bone Dab a small amount just under the arch of each eyebrow. Blend gently.
Step 7 — Brighten the Inner Eye Corners Dab a tiny amount into each inner corner of the eye.
Step 8 — Finish with Optional Spots Add to the cupid’s bow, forehead center, or chin if you want a more complete glow.
Step 9 — Set Your Makeup Lightly mist a setting spray over your whole face to lock in the glow and keep it looking fresh all day.
Powder vs Cream vs Liquid Highlighter — Which is Easiest for Beginners?
This is another topic most guides barely explain. Here is a simple breakdown:
| Type | Best For | Finish | Ease of Use | Best Spots |
|---|---|---|---|---|
| Powder | Oily skin, quick touch-ups | Shimmery, buildable | Very easy | Cheekbones, temples |
| Cream | Dry or normal skin | Dewy, natural | Easy | Nose, cupid’s bow, cheeks |
| Liquid | All skin types, mixing with foundation | Glowy, intense | Moderate | All-over glow, mixing |
| Stick | On-the-go application | Creamy, buildable | Very easy | Cheekbones, nose |
For complete beginners: Start with a powder highlighter. It is the easiest to control, the easiest to blend, and the hardest to overdo. A fluffy brush and a light hand is all you need.
Once you get comfortable, try a cream highlighter for a more natural, dewy look — especially in winter or when your skin is on the drier side.
Highlighter Placement by Face Shape
This is the section that almost no competitor covers in a beginner-friendly way — and it is one of the most useful things to know. Where you put highlighter should change slightly depending on the shape of your face.
Round Face
If you have a round face, your goal is to make it look slightly longer and more oval. Here is how to use highlighter to do that:
- Apply highlighter high on the cheekbones — close to the temple, not low on the cheek
- Add a thin line down the center of your nose — this draws the eye down and elongates the face
- Apply a small amount on the center of your chin — this pulls the eye downward, making the face look longer
- Avoid putting highlighter on the sides of your face or low on your cheeks — this makes a round face look wider
Oval Face
Oval faces are the most balanced face shape, and highlighter works easily here. You can follow the standard placement without much adjustment:
- Cheekbones in a classic “C” sweep
- Nose bridge
- Brow bone
- Inner eye corners
- Cupid’s bow
You have the most flexibility here. Try all seven placement spots and see what you love.
Heart-Shaped Face
A heart-shaped face is wider at the forehead and narrower at the chin. Your goal is to balance the wider top with a slightly more prominent lower face:
- Apply highlighter to the center of your chin — this draws attention to the chin and balances the wider forehead
- Keep cheekbone highlight softer and more centered — avoid sweeping it too far toward the temples
- Apply a tiny bit to the cupid’s bow — this draws attention to the mouth area, balancing the wider forehead
- Avoid heavy forehead highlighting — this makes the top half look even wider
Square Face
A square face has a strong jawline and a wide forehead. Your goal is to soften the angles and make the face look slightly more oval:
- Apply highlighter softly on the cheekbones — keep it centered, not too close to the sides
- Add to the center of the forehead only — avoid the corners of the forehead
- Add to the nose bridge for length and center focus
- Keep chin highlighting very light or skip it — you do not want to emphasize the strong jaw
- Avoid temples and sides of the face entirely
Common Highlighter Mistakes Beginners Make
Here are the most common mistakes — and how to fix them:
Mistake 1 — Using Too Much Product This is the number one problem. Too much highlighter does not look glowing — it looks greasy and overdone. Always start with less than you think you need. Build up slowly.
Mistake 2 — Applying to the Wrong Areas Many beginners apply highlighter to the flat parts of their cheeks instead of the cheekbone ridge. Remember — always go for the highest, most protruding bone.
Mistake 3 — Not Blending Enough Highlighter should have no hard edges. If you can see exactly where the highlighter starts and stops, blend more. Use circular motions and a clean fluffy brush.
Mistake 4 — Choosing the Wrong Shade A highlighter that is too frosty or silvery on a very deep skin tone can look ashy and unnatural. A highlighter that is too dark on a very light skin tone will not show up at all. Choose the right shade for your skin (see FAQ below).
Mistake 5 — Skipping Skin Prep If your skin is dry, flaky, or has texture, highlighter will sit on top of those patches and make them more noticeable. Always moisturize first.
Mistake 6 — Using Highlighter on Active Breakouts Never apply shimmer or highlighter directly on a pimple. It draws light — and attention — directly to it.
Mistake 7 — Applying Before Foundation Highlighter goes on top of foundation, not under it. Applying it first means it will get covered up or mixed in and lose its effect.
Mistake 8 — Matching Highlighter Shade to Foundation Only Think about your undertone as well. If you have warm undertones (yellow, golden skin), go for gold or champagne. If you have cool undertones (pink or bluish skin), go for silver, rose gold, or icy pink.
Frequently Asked Questions
Should I Apply Highlighter Before or After Foundation?
Always apply highlighter after foundation — this is the standard rule for beginners. Apply your foundation and concealer first, let it settle, and then apply your highlighter on top. This way, the highlighter sits on the surface and catches light properly.
The one exception is if you are using a liquid highlighter mixed into your foundation. In that case, you are adding luminosity to your base itself, which gives an all-over dewy glow. This is more of an advanced technique but works beautifully for special occasions.
How Much Highlighter is Too Much?
A good rule: if people can see your shimmer from across the room before they see your face, you have used too much.
Highlighter should enhance your natural glow — it should look like your skin is glowing from within, not like you spilled glitter on your face. Start with one light sweep of your brush. Look at yourself in natural light (not bathroom light, which is often too bright). If it looks good in natural light, you are done.
What Shade of Highlighter is Best for My Skin Tone?
Here is a simple guide:
| Skin Tone | Best Highlighter Shades |
|---|---|
| Very fair / Light skin | Pearl white, icy pink, silver, soft champagne |
| Light-medium skin | Champagne, rose gold, soft gold |
| Medium / Olive skin | Gold, warm champagne, bronze-gold |
| Medium-dark skin | Deep gold, copper, warm bronze |
| Dark / Deep skin | Rich copper, deep bronze, chocolate gold |
General tip: The more pigment and warmth in your highlighter, the better it shows up on deeper skin tones. Avoid icy or frosty shades on dark skin — they can look ashy or chalky. Warm-toned, rich metallic shades are stunning on deep skin tones and show up beautifully.
Can I Use Highlighter Without Contour?
Yes, absolutely. You do not need contour to use highlighter. Highlighter works perfectly well on its own.
Contour and highlighter are often talked about together because they work well as a team — contour adds shadows and depth, while highlighter adds brightness and lift. But they are completely separate products and you can use either one independently.
If you are just starting out, master highlighter placement first. Add contour later once you feel confident. Many people use only highlighter and get beautiful results every day.
Conclusion
Where to put highlighter on face does not have to be complicated. Once you understand the basic idea — apply it where light naturally hits your face — everything else falls into place.
Start simple. Begin with just your cheekbones and nose bridge. Those two spots alone will give you a noticeable, beautiful glow. Once you feel comfortable, add the brow bone and inner eye corners. Then experiment with the cupid’s bow, forehead, and chin.